Fujitsu P8010 Laptop Disassembly and Hard Disk Drive Replacement
Time-stamp: <2011-12-08 10:07:59 jjd>
This is a guide for how to replace the hard disk drive on a Fujitsu P8010
laptop including how to disassemble the machine to get to the drive. The
length of this document would indicate that this is a long and
complicated process, when in fact it was relatively easy. This
document is long just because I'm trying to be complete.
I have a Fujitsu P8010 that I purchased direct from Fujitsu USA in August 2008.
The machine is a
very nice combination of performance, small size, light weight and a
nice keyboard and display. It is almost netbook size, but with a
real dual core processor, 4GB of RAM and an optical drive. On it, I run Ubuntu
Linux (10.10, currently) as well as (occasionally) Windows Vista. The
commands used below to duplicate the disk are for Linux. Presumably
you could do the same thing from Windows using a tool like Norton Ghost,
Acronis True Image, or Macrium Reflect. I don't have experience with
these tools.
In December 2010, I
started seeing disk errors in the console log. They looked something like this:
[   78.711885] sd 0:0:0:0: [sda] Unhandled sense code
[   78.711888] sd 0:0:0:0: [sda] Result: hostbyte=DID_OK driverbyte=DRIVER_SENSE
[   78.711893] sd 0:0:0:0: [sda] Sense Key : Medium Error [current] [descriptor]
[   78.711900] Descriptor sense data with sense descriptors (in hex):
[   78.711903]         72 03 13 00 00 00 00 0c 00 0a 80 00 00 00 00 00
[   78.711919]         12 2a b0 5f
[   78.711925] sd 0:0:0:0: [sda] Add. Sense: Address mark not found for data field
[   78.711933] end_request: I/O error, dev sda, sector 304787551
... and ...
[   78.711941] Buffer I/O error on device sda6, logical block 16790233
[   78.711945] Buffer I/O error on device sda6, logical block 16790234
In my experience, this can only mean one thing: The disk is going to
fail. Maybe not today. Maybe not tomorrow, but soon. Maybe
tomorrow.
Copying Data to the New Disk
-
Since my disk was compromised (as it was failing) I booted off a
Linux live CD. I used the Ubuntu 10.10 install CD, but you could
probably use just about any other live Linux CD such as KNOPPIX.
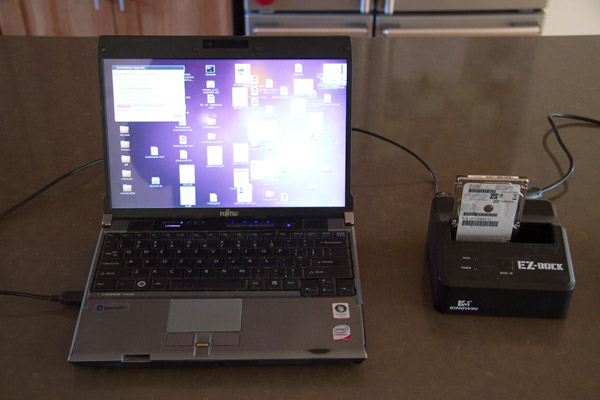
- Now, we need the new disk connected to the computer as well as the
old disk. I used a nice docking station adapter from Kingwin that allows a bare SATA
drive to be inserted and can then be connected to the computer with
USB. These only cost about $20 and are well worth having around to
deal with disasters like this. You can see it in this photo:
-
A friend recommended that instead of using straight Ubuntu ‘dd’
command to copy the disks, that I instead use ddrescue which is
better about copying when the reads might result in failure due to the
dying drive. I loaded the ddrescue tool using ‘sudo apt-get install
gddrescue’. The ddrescue man page recommends that you use a logfile
in order to keep track of anything that fails. So I used the command:
ddrescue /dev/sda /dev/sdb /nfs/otherhost/u/jjd/ddrescue-logfile
This took about four hours to copy my 160GB disk. At the end, the
output looked like this:
Press Ctrl-C to interrupt
Initial status (read from logfile)
rescued:   160041 MB,  errsize:    4096 B,  errors:       1
Current status
rescued:   160041 MB,  errsize:    4096 B,  current rate:        0 B/s
   ipos:         0 B,   errors:       1,    average rate:        0 B/s
   opos:         0 B,     time from last successful read:       0 s
Finished
This indicates that after all its automated retrying, ddrescue was still
unable to copy 4096 bytes from the old disk to the new disk. This was
towards the end of the copy, so I knew it was in my sda6 partition
which had already been damaged due to the disk errors. I was OK if
that partition was lost.
- Once the copy was done, Linux didn't recognize the new
partitions on the new disk due to the fact that /dev/sdb1, /dev/sdb2, etc. didn't
exist. I solved that problem by unplugging the USB disk from the
computer and plugging it back in. At that point, Linux noticed the
partitions properly.
- Before mounting the newly copied partitions read/write, it's important
to run fsck to make sure they are OK. So I ran:
fsck -f /dev/sdbN
for each N that contained a Linux filesystem. In my case, it found no
errors on any partition except my /dev/sdb6 that I knew had been
damaged. Fsck fixed the errors on /dev/sdb6 (presumably by clearing a
few files), and I was able to mount it at that point.
- If your new disk is larger than your old one, at this point you
can use a tool like gparted to add new partitions in the unused space
on the new disk, or to grow existing partitions.
gparted /dev/sdb
- Once you are happy that the old disk has been copied to the new
disk and the filesystems repaired, it's time to exchange the disks.
Disk removal
So, the first thing I needed to do was figure out how to open up the
machine to access the hard disk. Typically, I would search the
Internets for "fujitsu p8010 disassembly" or "fujitsu p8010
hard-disk-replacement" but no matter what my search terms, I couldn't
find any instructions or videos on how to disassemble the machine. I
needed to be sure I could disassemble the machine before investing in
a new hard disk so I could be sure I could replace it successfully.
Lacking any help from the net, I started on my own. It turns out it
was substantially easier than I thought it was going to be. My usual
problem disassembling modern electronics is that they are made of
plastic that requires bending and snapping to get the pieces apart.
This often leads to broken pieces. Luckily (and surprisingly) the
back panel of the P8010 is actually made of aluminium. I suspect that
Fujitsu determined that plastic didn't have sufficient structural
integrity at the thickness they needed.
Here are the steps I followed:
- Shut down the machine
- Remove the battery
- Turn the machine upside down. Using a very small philips head
screwdriver, remove the two screws holding the door over the memory slots. This is the
one that probably has the Windows authenticity sticker on it.
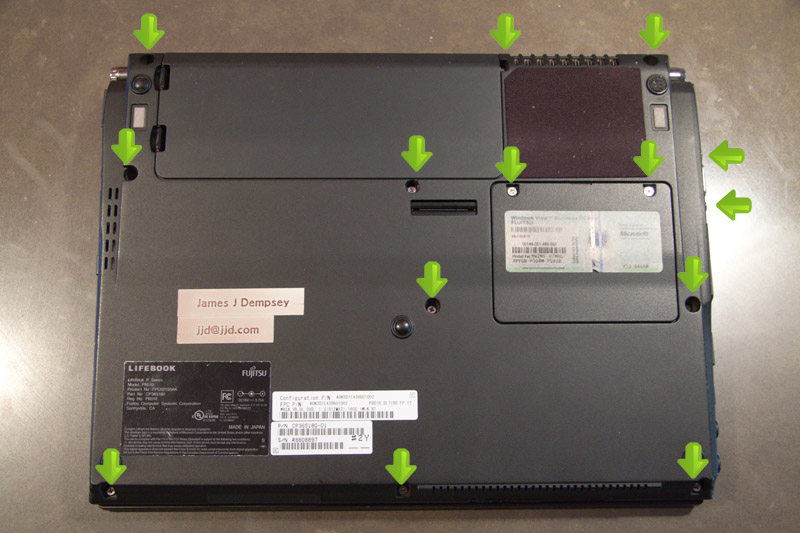
- There are 10 other screws on the back that need to be removed. You
have to be careful and keep track of which screws came from where
because there are three different sizes. Basically, you need to
remove every screw you can see on the back, except for the tiny screw
that is usually hidden by the battery.
- Finally, you need to remove the two bolt-like lugs surrounding the
VGA connector on the left side of the machine. I happened to have the
right size socket for this, but I suspect you could use small pliers
if you had to.
- At this point, you can open the case slightly on the right side,
and then slide it off the connectors on the left side.
You can see your target, the disk drive, staring at you in the upper
right of the case as in the pictures here: (Note that in these
pictures, the P8010 is
upside down in orientation compared to the assembled picture above.)

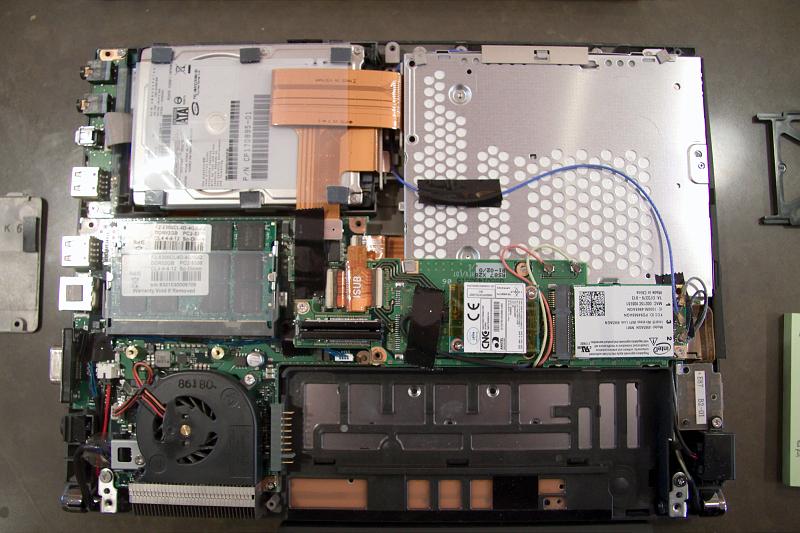
- The entire drive can slide carefully out of its SATA connector
now. Be careful of the orange folded SATA connector cable.
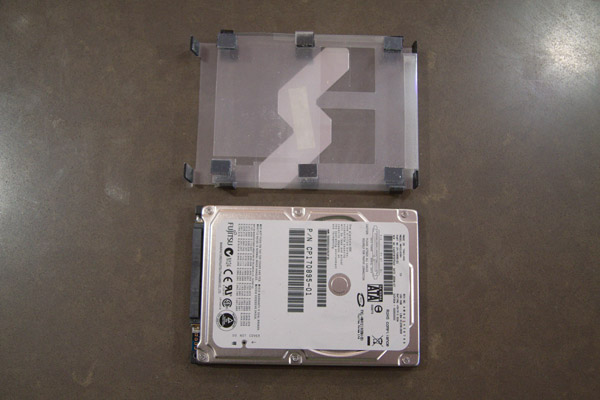
- The drive is inside a plastic envelope of sorts. It seems to be
there to reduce vibration and possibly help with static and
grounding. Carefully slide the old drive out of the plastic envelope,
as seen below.
The drive I found inside is a Fujitsu 160GB MHY2160BH. It is a
2.5" SATA drive with 9.5mm height. Presumably any 2.5" SATA drive of
9.5mm or less should work as a replacement.
For reference, the specifications for the OEM drive are as follows:
- 160 GB storage capacity
- Serial ATA interface
- 150 MB/sec data transfer rate
- 5,400 RPM spindle speed
- 8 MB buffer
- 14 ms average write seek time
- 12 ms average read seek time
- 1.5 ms typical track to track seek time
- 22 ms maximum seek time
- 5.56 ms average latency
- 9.5 mm drive height
I chose to replace the OEM drive with a Seagate Momentus XT
ST93205620AS 320GB 7200 RPM 32MB Cache 2.5" SATA drive. I paid $109
for this drive from newegg.com.
The interesting feature of the new drive is that it is a “hybrid”
SSD/magnetic drive. It has 8GB of SSD memory to optimize frequently
accessed sectors from the solid state memory to avoid accessing the
rotating media. User reviews indicate that it can be substantially
faster as well as operating cooler. It will be interesting to
see if this really is faster in my typical Linux environment.
- Now it's time to put everything back together. Carefully slide
the new disk into the plastic sleeve and then slide the sleeve back
inside the P8010, being careful to insert the SATA connectors
properly. I held the cable connector with a screwdriver so I could
push the disk against it to set it properly. Then, put the case back
on and put all the screws back in their proper places. Voila! You are done.
--Jim Dempsey--
Update: December 2011
I've now had this new Seagate Momentus XT hybrid drive for a year. It
has worked well with some notable exceptions. Other users of the
drive (not me) started having significant problems, particularly when
the drive spun down. As a result I updated the firmware on the drive
to the latest firmware, but it basically disabled the drive spindown
feature which reduces battery life and increases heat.
Seagate now has a next generation Momentus XT (here
at newegg.com) that is 750GB and, according to Seagate's community
forums, solves the spindown problems. Users are reporting very good
performance for this new drive.
Credits
If you are looking for info on how to replace the disk on a Fujitsu
P7000 series (P7010D), please check out Stephen's page on LifeBook
P7000 Disk Replacement. He's the one who encouraged me to write
this page in the first place.